
How to add CAPI Facebook Tracking a lead form submission using GTM and Deviate Tracking
Before starting this walkthrough, Google Tag Manager (GTM) must be installed. Find out how to properly install GTM or double check if it’s already installed to start tracking on <here>.
Adding in variables per tag/trigger is a redundant task and easy mistakes can be made, so it’s best to configure the required Deviate Tracking variables beforehand. This will help avoid easy mistakes and save time in the future. <Setup and preconfigure the required Deviate Tracking Variables with this tutorial>.
The first step to tracking a lead form submission, is getting the element ID or class name of the form to be tracked. Navigate to the lead form’s page and right click on the form > click “Inspect” or “Inspect Element.” The shortcut to Inspect Element on the browser being used may also be Command+Option+i or F12 depending on your operating system and browser.

Once this is done, the Inspect Element tool will appear and the lead form code should already be selected. Otherwise, or to double-check that the correct code is selected, look for the line that begins with ‘<form’
![]()
To specify GTM to track this form specifically, find the class or element ID attribute within the same line of code. This attribute is either shown as id=”leadForm”, or class=”leadForm.” In the case of this example, the Form ID is equal to “test,” and the Form Class is equal to “wpcf7-form init”
![]()
The form will usually have either this ID or Class attribute set to identify this specific instance. If, in any case, neither of these HTML attributes are present then this tracking method will not work. Deviate Tracking recommends contacting the site’s developer for advance help or making a request to add a form ID or Class Name attribute to the form.
Once the form’s ID or Class Name has been identified, the Trigger within GTM can now be configured.
Firstly, within GTM, create a Trigger so that the Deviate Tracking Tag fires accordingly on the website. Within GTM’s Workspace, find the Triggers option in the left-hand side menu. Click ‘New’ to start configuring the Trigger to track the form.

[Image of ‘New’ button in the Trigger section of Workspace]
Click on Trigger Configuration and choose the Form Submission trigger type.
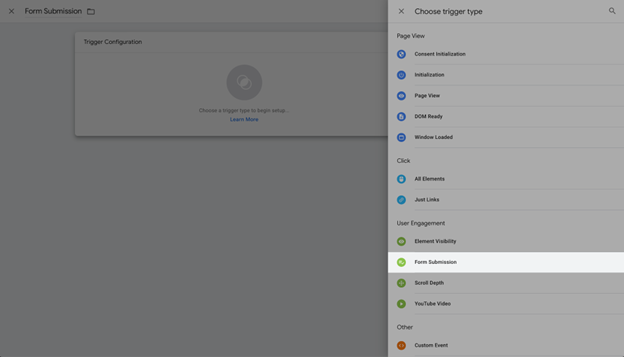
[Image of Form Submission Trigger Type selected in Trigger Configuration]
If a user submits the lead form and it redirects the user to a thank you page (or any new page that is loaded upon submission), then it’s a good idea to make sure that appropriate tags fire before the redirect completes (otherwise there’s a risk of missing out on tracking events). Do this by checking the ‘Wait For Tags’ checkbox, setting the new Max Time field, and then configuring the conditions to fire this Trigger.
Essentially, with Wait for Tags enabled, GTM will pause the form submission for as long as all the Tags that use the Trigger have actually fired on-page, or until the set max timeout has expired.

[Image of Wait for Tags and Max Time set as described]
Enabling “Check Validation” tells GTM to only fire the Tag if the form is successfully submitted. If left unchecked, the Trigger will go off whenever a user tries to submit the form, whether or not the submission is prevented or is successful. It is recommended that you check this box.
Now, a variable must be used to specify the form to fire the tag from. If, for example, the site is a single landing page, or a website with only this one form, then selecting All Forms will work. However, if multiple forms exist on the website, then add a condition to specify the Tag to fire when this form with id=”test” is submitted.
Start by choosing the fire on ’Some Forms’ option within the Trigger Configuration for this Trigger. In the first dropdown, choose Built-In Variable and select either Form ID, or Form Classes depending on the attribute extracted from the page earlier using Inspect Element. If using Form ID, set the second dropdown to “Equal” and input the Form ID in the third dropdown.

[Image of Form ID variable set]
If using the Form’s Class, then set the second dropdown to “Contains” and input the Form’s Class Name in the third dropdown.

[Image of Form Class variable set]
Once the Trigger is configured, the Tag then needs to be created, and then the configuration should be tested to ensure that it is firing correctly before publishing.
After configuring the trigger, the next step is to create the Tag using Deviate Tracking’s Tag template found in the Community Template Gallery. Navigate to the Workspace’s left-hand side menu, and go to Tags. Select ‘New’ and click the empty Tag Configuration box. Click the blue bar to open the Community Template Gallery and search for Facebook Conversions API (CAPI) by DeviateLabs.
Click Add to Workspace or Choose Template depending on if the template has already been added or not. Now, the Tag just needs to be configured.

[Image of the searching for Deviate Tracking in the Community Template Gallery]
With the Deviate Tracking variables already pre-configured for the Tag, simply click on the Add Variable icon and choose the appropriate variable for each option; Deviate Tracking Email, Deviate Tracking Key, Facebook Token, Facebook Pixel ID. Now, set the Event Type to Lead and then set the Trigger to the one just created.

[Image of configuring the Tag for Deviate Tracking using the Built-in Variables and CAPI from the Community Template Gallery]
As always, test the new Tag and Trigger setup before publishing the Container and pushing out a new Version. Use Preview Mode in GTM to test that the Tag is firing accordingly on the correct pages and tracking the specific form.
If the Trigger is not firing the Tag in Preview Mode, a simple solution may be to adjust the trigger’s settings and parameters.
If the form tracking has not yet been tested, then open the website in Preview Mode and navigate to the page with the form. Test the form by submitting it.
- Click on the event that showed up in Tag manager then click variables
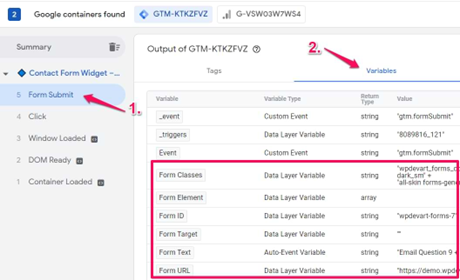
In the Event Timeline on the left-hand side, open the Form Submit event and open the Variables tab that appears within the Container’s Output Summary.
- Check what is contained in form classes or form element
- Adjust trigger settings parameter
You may need to change ‘equals’ or ‘contains’ and test again
Resolve what is contained in the Form Class or Form Element variable by adjusting the trigger settings. To do this, change the expression that declares this attribute (‘Contains’ or ‘Equals’) and test again.

[Image of changing the Trigger conditions]]
In Tag configuration settings, where Deviate Tracking’s Facebook CAPI and the 4 built-in variables are, choose Advanced Settings > Tag Firing Options > select Once Per Page

[Image of selecting the Tag to fire One Per Page within the Deviate Tracking Tag Configuration]
Additionally, the Trigger can be configured to fire only on the form’s page. Within Deviate Tracking’s Trigger Configuration, add a Built In Variable and select the Page Path option. Select Contain in the next dropdown and enter the Page Path in the field next to it.

[Image of configuring the trigger to fire on the form’s page only]
Read <this walkthrough> so the Deviate Tracking PageView tag is installed and firing properly on the same page that the lead form is on.
Before publishing any changes, test them in Preview Mode to check if any Triggers and Tags are firing accordingly and also on the correct pages. Most issues can be resolved and debugged and resolved in Preview Mode inside GTM. <Here’s a tutorial that walks through Preview Mode in Google Tag Manager>.
With Facebook Pixel installed on the site, use the Test Events Tool in Events Manager to test events. This <walkthrough of Facebook’s Test Event Tool> will make it easier to test events.
Please note: Make sure that test mode is off in the production environment. To do this, head over to the Deviate Tracking Tag configuration and under the ‘User Data Parameters’ is a checkbox asking to ‘Send as a Test Event?’ Ensure that this is unchecked when real data is being tracked. This option should only be enabled when Preview mode in GTM is being used.

[Image of disabling Test Mode in Deviate Tracking Tag inside of GTM]